A VOIR
▼
lundi, novembre 21, 2016
Base "levitation" Tutorial
Salut à tous
Pour un petit projet sur une fig blacksun miniature The head hunter (sculpture David Ayral), j'ai voulu m'amuser en construisant un socle avec des plateformes, lévitant au dessus du socle en bois.
Je l'avais fait il y a longtemps sur mon typhus
http://www.puttyandpaint.com/projects/8352
Hi all,
For a little project on black sun miniature : The head hunter (sculpture David Ayral), I tried to make fun by building little platforms, levitating above the wooden base.
I made it a long time ago about my typhus miniature.
http://www.puttyandpaint.com/projects/8352
Docn le plan est de faire simple, et plus petit.
Etape 1 : la structure :
J'ai besoin d'un support pour construire les plateformes, et du fil de fer fer l'affaire. 2 tiges sont fixées sur le socle.
So the deal was to make it simple, and smaller now.
Step1 : the structure :
I need a structure to support the building of the platforms, and wire will do the job. 2 of them fixed on the wood base.
Une fois que j'ai décidé ou placer les volumes, je plie les tiges, pour avoir la forme et la positions des future bases flotantes.
Once I got the idea of the placing of my volumes, I bend the wires, to have the shape and placement of my future floating base.
J'utilise alors de la pate de plomberie, 2 composants, qui durci en 5 minutes, dur comme de la pierre, une fois mixée.
Than I use a specific plumber paste, 2 components, and cures in 5 minutes, rock hard, when mixed.
La pate étant maintenant tres dure, tout est en place... encore pas sur pour la partie haute.. mais continuons.
Etape 2 : Le volume
J'applique du Milliput, et c'est bien la l'avantage de la première pate, durcissant si vite, qui tiens tout en place, alors que le Milliput est bien plus difficile a forme et fixer sur un support. La pate de plomberie comme support, le Milli tiens parfaitement.
The paste is now very hard, and all is fixed in place.. still not sure about the upper platform... but let's continue
Step 2 : the volume
I apply milliput, and this is the advantage of the first paste, as it cures so fast, it sticks in place, while milliput is much more difficult to put and shape as you want. Using the plumber past as the basement, milliput is easily fixed.
J'ai donc sculpté la forme de chaque partie, avec du bois, de la pierre, en texturant par pression sur le Milli.
J'ai finalement coupé la partie haute pour y mettre une pierre tombale. J'ai trouvé quelques décors Rackham, et ajouté des détails au socle.
I have sculpted then the shape of each parts, using wood, or stone part to texture by stamping over the paste.
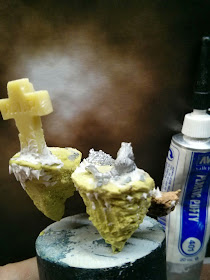
I have finally cut the upper platform, and place a tomb sign. I found some rackham scenery, and add details to the base.
Les petites parties blanches, comme des concretions calcaires, sont faite avec un tube de Vallejo putty... très fragile, donc évitez de toucher avant séchage complet.
The little white stuff, like calcareous shape, are made using the tube of vallejo putty... pretty fragile so avoid touching it before totally dried.
Finalement, j'ai pris de la glue et de la vraie terre, et éparpillé un peu de terre et poussières, sur certains endroits, surtout sous chaque plateforme.
Finally, I took glue and real earth from a plant, and spread some earth and dust over certain place, and mostly below each platforms.
Et voila.. peint... (le head hunter est toujours en cours)
Here we go... painted ! (the head hunter is still WIP)


Awesome tutorial =)
RépondreSupprimer