Salut à tous,
Récemment je me suis lancé dans la peinture du buste "LA HIRE" de Young Miniature, et ca ne m'a même pas traversé l'esprit de faire autre chose qu'un TMP pour celui la.
Le souci est ... Je n'ai absolument aucune idée de comment faire, car je fais quasi tout le temps du NMM.
Donc j'ai cherché l'inspiration.
Hi Guys,
Recently I want to paint the huge bust "LA HIRE" from Young Miniature, and I did not think even a minute something else than TMP for this.
The issue is.. I have absolutely no idea how to proceed, as I almost all the time use NMM.
So I went first for inspiration .
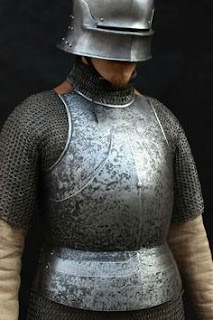
 |
| old armor plate |
 |
| Verdigris? |
 |
| Here we go, found it !! |
Je voulais que l'armure soit très endommagée, par le temps et les batailles.. Donc cette derniere image est vraiment ce que je cherche.
Avant de commencer sur ce buste impressionant de la Hire, j'ai décidé de commencer plus petit, sur un buste FeR.
J'ai séparé l'armure en deux avec du scotch de masquage, pour pouvoir essayer plusieurs techniques a différents endroits.
I want the armor really damaged by the time and battles... Thus the last pictures was really my target.
Before starting this impressive bust "La Hire", I have decided to start smaller, on FeR miniature
I split the armor using masking tape to try few methods on different places
 |
| first test ! |
On a black undercoat, I used small brush where I have cut the hair. Doing some vertical movements, I start to create the texture.
 |
| cut brush |
Cependant, après 2 tests, je trouve le résultat trop propre.. ma photo de référence est bien plus orange, rouillée, variable, raillée...
It's ok, but the results is still too clean... Of course I need glazes. I used brown, red, blue... pushing the dark tone where I do not want brightness. It's indeed easier when undercoat is black, and moreover if you have applied your metal texture more on the light, than in the shadow placement.
However, after 2 tests, I find the result still too clean.. my reference picture has much more orange, rust, variations, scratches...
 |
| okayish.. but not enough |
J'ai débuté avec du orange, marron et dark sea blue. Ce dernier concentré dans les ombres.
So let's start again on the helmet. I have decided then to start brushing roughly colors, before using mettallics.
I start using orange brown, and dark sea blue. This last concentrated only on the shadows.
 |
| colored texture on helmet |
 |
| rough texturing |
Then I fill my brush with mettalics (steel PA), wipe it on paper, like for drybrushing (maybe a bit less) and hit vertically the surface of the helmet. Try to avoid a bit the shadow area, and preserve my orange below at some place.
 |
| much more textured |
 |
| closer and closer to what I want |
Bien sur, au final, il faut ajouter des éclaircis extrême, avec de l'acier PA pur, et même du chrome PA.
Then the work using glazes starts. Again brownish from below, blue, and I have added some Modelmate Rust products at some place. I tried also verdigris here...
Of course at the end, you might add some extreme highlights, using pure mettalic steel, or even chrome.
 |
| final results |
 |
| my test result |
 |
| ok not too bad |
Here is the final result. I feel that I need now to adapt things. For "La Hire" Verdigris will not work well. Or maybe I will restrict here on some parts looking more copper than steel.
Alors ca repart :
- Sous couche noire, mais aussi pre ombrée blanc au dessus par zones spécifiques de l'armure que je voudrais plus claires à la fin.
So let's start again :
- black undercoat, but also white from the top on specific armor part to render them brighter at the end
 |
| black and white undercoat |
- Orange/bleu texturée en premier
- Orange/blue texture first
 |
| principal color used |
 |
| after applying colors |
- J'ai utilisé Steel PA air + noir, et tapoté la surface avec mon pinceau raccourci, verticalement. J'ai découvert que l'impact de cette étape est plus frappant sur sous couche noire. Je vais devoir traiter un peu différemment les zones sous-couchée en blanc, avec plus de glacis a la fin.
- I used steel mettalic from PA air + a bit of black and hit the surface with my shortened brush, vertically. I discover the impact of this step is way more stricking on black undercoat. I might have to treat the other white part differently using glaze afterwards.
 |
| with metallics |
- Alors je commence les glacis. Sur les partie sombres, beaucoup de bleu passé, et coal black particulièrement. Je veux garder ces zones sombres.. très sombres avec un aspect bleuté. Les parties sous-couchées en blanc reçoivent plus de marron/rougeâtre
- Then starts the glazing step. On the darker parts, I used quite a lot of blue, and coal black particularly. I want to keep those parts (black undercoat) very dark, with blueish aspect. The other parts have received quite a lot of brown/redish.
 |
| with glazes |
 |
| lower ring bronze |
- Last highlights using first steel, and finally chrome. The bottom ring of the glove have received a different metal, more like a bronze, and I place some verdigris there, which fits much better.
Merci
Here is the end results. I still need to tweak it a bit with rust but I feel ok with continuing on the other parts. I hope it will help a bit.
Thanks
Spécial Thanks to Jerome Otremba / Merci particulier à Jerome Otremba.


Wonderful, I hope to try this myself
RépondreSupprimerthanks a lot, glad if it helps
SupprimerLe résultat est top, ça donne un effet vecu très réaliste. J'essayerai surement sur mes mort vivants Rackham que je suis en train de peindre en TMM.
RépondreSupprimerUn grand merci pour le tuto!