vendredi, décembre 07, 2018

Posted by Guillaume On vendredi, décembre 07, 2018

Salut !
Hi !

Voici le tutoriel que tout le monde attendait ! La célèbre palette humide made in Ferrero. Nous allons vous expliquer comment fabriquer en deux temps, trois mouvements, une palette humide ultime à moindre coût...environ 15€.

Here's the tutorial that everyone was waiting for! The famous wet pallet made in Ferrero. We will explain you how to make realy quickly an ultimate wet pallet at a lower cost...about 15$.

ETAPE 1 / STEP 1 :


Pour commencer, achetez une boite de Ferrero Collection et mangez la le plus vite possible. Pas de pitié !

To get started, buy a box of Ferrero Collection and eat it as soon as possible. No mercy!


Important, vous devez faire attention en achetant la boite à ce qu'elle ait un fond carré ce qui facilitera le positionnement des éponges et permettra d'avoir une meilleure répartition de l'eau. A ma connaissance, cela correspond uniquement aux modèles avec les Raffaellos. Il en existe deux formats, rectangle (celui sur les photos) et une version carrée encore plus grande.

Important, you must be careful when buying the box. The base of the box must be a square which will facilitate the placement of the sponges and will allow a better distribution of the water. To my mind, this only corresponds to the models with the Raffaellos. There are two formats, a rectangle (the one in the photos) and an even larger square version.


Pensez aussi à garder la feuille se trouvant au fond de la boite, elle nous servira de patron pour les découpes. 

Also remember to keep the sheet in the bottom of the box, it will serve as a template for the cuts. 


ETAPE 2 / STEP 2 :


Nous allons disposer dans le fond de la boite deux types d'éponges différents. Comme vous pouvez le voir sur la photo, j'utilise la marque Spontex. L'éponge de gauche "Carréponge" servira à stocker l'eau tandis que l'éponge de droite "Tiponge", plus lisse, évitera que des bulles ne se forment sous le papier cuisson.

We will place two different types of sponges in the bottom of the box. As you can see on the picture, I use the Spontex brand. The left "Carréponge" sponge will be used to store water. The right "Tiponge" sponge, which is smoother, will prevent bubbles under the baking paper.


On découpe les éponges au format de la boite à l'aide du patron Ferrero et on les dispose dans la boite. Rappelez vous "Carréponge" puis "Tiponge".

The sponges are cut using the Ferrero pattern and placed in the box. Remember "Carréponge" then "Tiponge".


ETAPE 3 / STEP 3 :


Ensuite, on remplit la palette d'eau jusqu'à ce que les éponges baignent. Il faut trouver le juste dosage pour qu'il y ait assez d'eau en contact avec le papier cuisson sans en avoir trop. Cliquez sur la vidéo ci-dessous pour comprendre.

Then, the pallet is filled with water until the sponges are immersed. It is necessary to find the right dosage to ensure that there is enough water in contact with the baking paper without having too much. Click on the video below to understand.


ETAPE 4 / STEP 4 :


Dernière étape, je découpe à l'aide du patron Ferrero un rectangle de papier cuisson que je dispose sur les éponges. Je chasse les quelques bulles d'eau à l'aide de mon doigt jusqu'à ce que la surface soit impeccable.

Last step, I cut out with the Ferrero pattern a rectangle of baking paper and I place it on the sponges. I remove the few water bubbles with my finger until the surface feels perfect.


Photos finales / Final pictures :


Et voila, pour 15€ de plaisir, vous disposez maintenant d'une belle palette humide digne de ce nom. Vous pourrez garder facilement vos peintures plusieurs jours. N'oubliez pas de changer les éponges régulièrement pour éviter les moisissures ou à minima de les laver à l'eau chaude. 

Attention, le couvercle est la partie la plus fragile mais en la manipulant avec soin elle vous tiendra facilement l'année. La mienne ci-dessous m'a duré 2 ans et a résisté à de nombreux workshops et déplacements (SMC, montrouge and co).

J'espère que ce tuto vous a plus et à très bientôt sur Chestnut Ink !

And here it is, for 15€ of pleasure, you now have a beautiful wet pallet to be proud of. You can easily keep your paintings for several days. Don't forget to change the sponges regularly to avoid mould or at least wash them with hot water. 

Be careful, the cover is the most fragile part but if you handle it with caution, it will stay with you easily throughout the year. Mine survive easily 2 years and have resisted many workshops and trips (SMC, montrouge and co).

I hope you enjoy this tutorial and see you soon on Chestnut Ink!

jeudi, décembre 06, 2018

Posted by Anonyme On jeudi, décembre 06, 2018

Salut
Depuis le début de cette année, j'ai travaillé sur le diorama D&D, et vous avez déjà vu mes sources d'inspirations, la construction du socle, les figurines peintes, et je vais maintenant parler de l'eau ! avant que vous voyiez les photos finales.

Hi guys,
Since begining of this year I worked on the D&D diorama project, and you have seen already my inspirational work, the base construction, the miniatures painted, and now I will talk about water ! before you see the final pictures !

Base ready for resin

The big place for water

Donc vous voyez ici la rivière du niveau haut, et plus près le niveau bas, totalement sous l'eau, ou les draugr sont en train d'essayer de choper les heroes.

Donc commençons les explications :
Tout est deja peint, de façon à donner la couleur du sol, du fond ou l'on verra à travers l'eau.

So you see there the river on the top level of the base, and more closely the lower level, totally underwater, where draugr are trying to catch the heroes...

So let start with the preparation :
you can see that everything is painted, in a way I gave the color already of the floor, and underground as it will be seen through water.

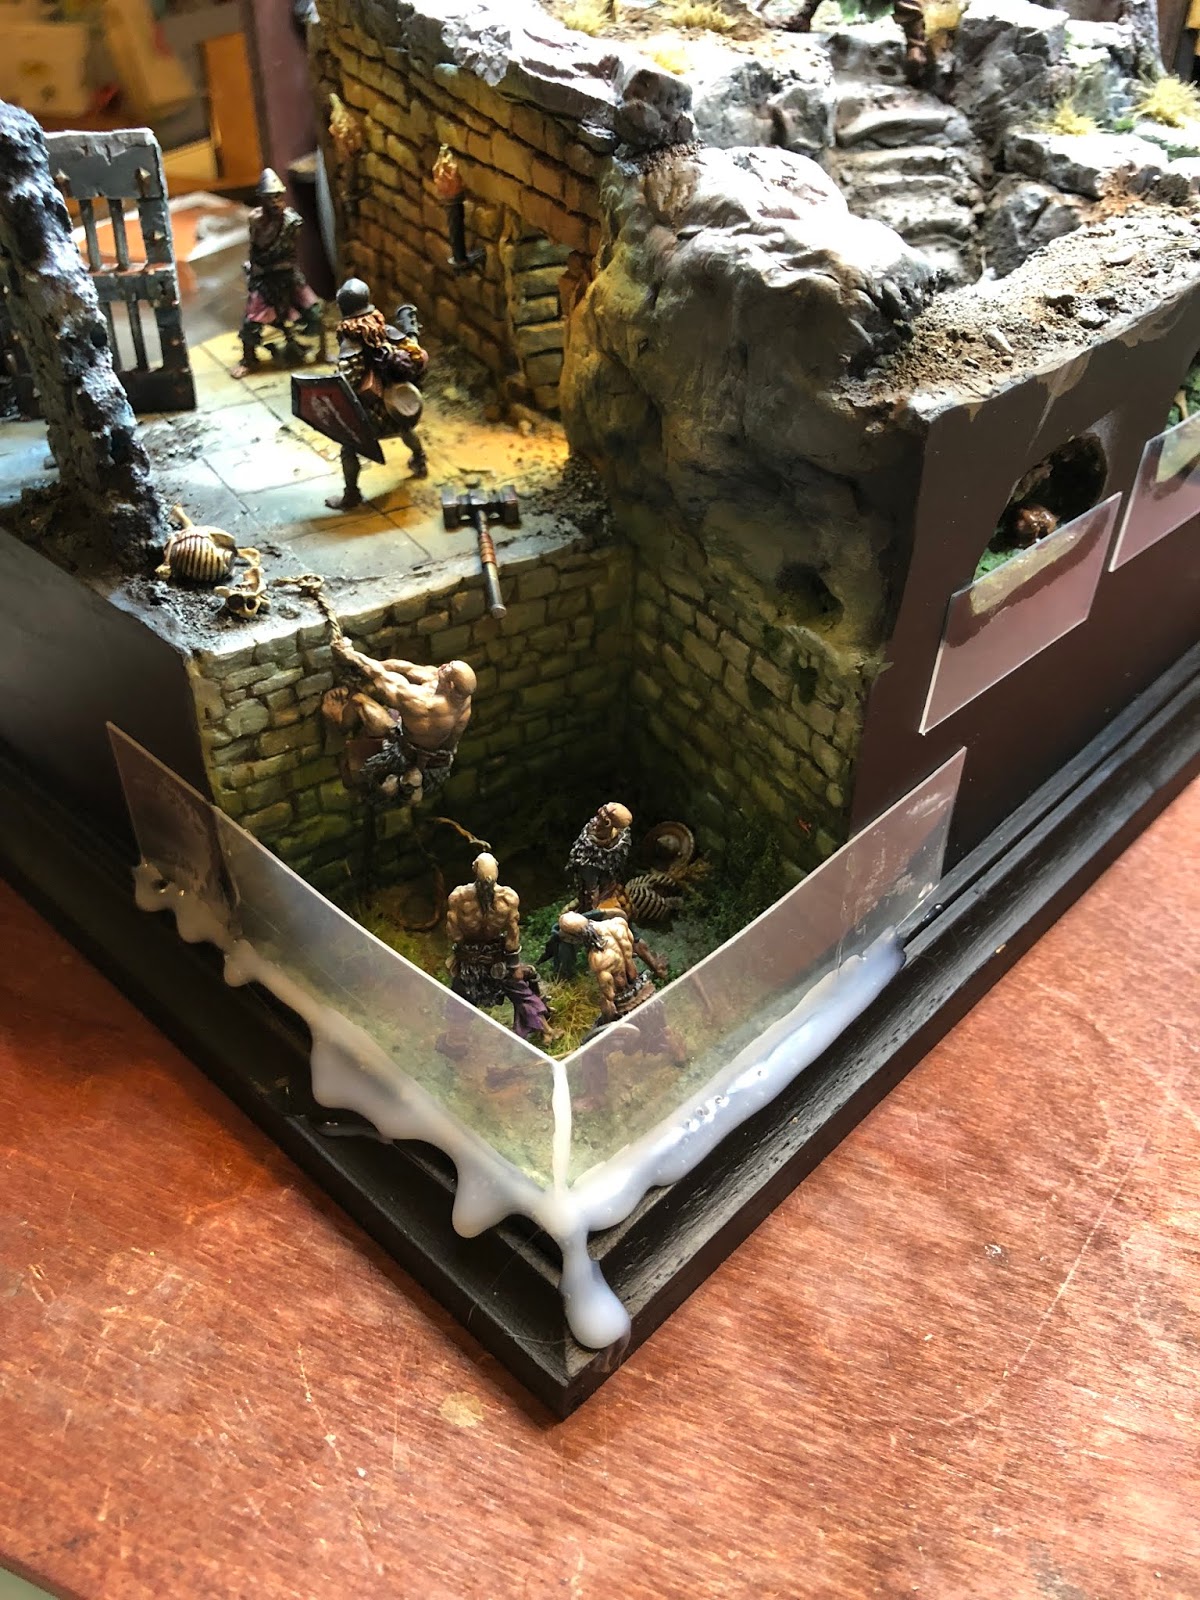
framing

little river on the side

J'ai utilisé comme Olivier (merci pour l'info) du polypropylène pour faire le coffrage.
J'ai collé au coté du socle le plastique, et en ayant tracé au cutter la ou je voulais le plier, j'ai pu le plier sans avoir a le couper en deux pour faire l'angle.

I used like Olivier (thanks for the trick) the polypropylene plastic to frame the water place.
I glued it to the base side, and by tracing with cutter where you want to bend it, you are not forced to use 2 separated parts to close the angle if needed.

More glue
C'est donc collé avec de la cyano + pistolet colle la ou ca chevauche la base en bois.
Vous pouvez donc voir que j'ai placé quelques plantes, je voulais créer une zone un peu trouble, comme envahies par des mousses.

It's glued on side using cyano glue, + glue pistol where it touch the wooden base.
You can notice that I placed some plants, I wanted to make the underwater part a bit fuzzy, kind of moss invaded ..


Gedeo resin with ink

Pas de surprise j'ai utilisé la résine Gedeo + peinture Vitrail Alkyl.
J'ai attendu un peu avant de couler dans mon coffrage.

No surprise I used Gedeo resin, 2 part component, + Vitrail alkyl based ink.
I let it sit a bit and pour in to my frame.

Now it's filled

Water tank

small leakage

Vous noterez comment les bords se sont courbé à cause de la quantité de résine? J'ai donc contrebalancé ca en appliquant un peu de pression depuis l'extérieur.

You notice how the edge bend due to the large amount of resin poured? I had then to fix that by putting pressure from the exterior.

Reacting to unexpected event

Disons.. peu académic, mais ca marche.

Je dois admettre que j'ai eu quelques fuites sur les cotés, la ou la rivière passer sous le décor, mais comme j'ai coulé la résine déjà un peu durcie, ca c'est vite stoppé.

Kind of ... experimental but it works ;)

I should admit that I got some leakage on the side, the little river on the base side had a little bit of resin escaping, but as I used the resin already a bit cured, it stops after a short time.


Refill needed here

J'ai donc rajouté encore un peu de résine lorsque la fuite est finie.

I had then to bring more resin when leakage is over.

Top river flow
J'ai placé aussi de la résine sur le chemin de la rivière et surprise !! la résine s'est infiltrée dans un trou, la ou elle est censé effectivement passer, mais la résine à trouvé le moyen de ressortir... dans le tunnel !! Arf !!!

I placed also resin in the upper river, and I got a surprise !! resin falling into the hole, where the river is suppose to go on the side of the base, but resin find its way into the bas structure, to exit.. on the tunnel !!! Damn !!!

Unexpected... nice event
Mais finalement .. ca rend bien !!!  Tout arrive pour une raison !!

Les chutes d'eau :

And.. finally.. it looks cool !!! everything happens for a reason !!

Waterfall :

Water gel to create waterfall

different shapes

J'ai utilisé du gel eau artificiel appliqué au pinceau sur du plastique.
Cela m'a permis, une fois sec, de le couper en morceau, et de le placer la ou mes chutes d'eau doivent être.

I used water gel brushed into plastic card.
This allow me, when dried, to cut this into pieces, and place it where I want waterfalls.

Waterfall placed

La rivière du haut, c'était simple.. mais je me suis demander comment faire la chute d'eau d'en bas.

The top river, it was easy.. but I wonder how to place the big water fall in the bottom level.

THE BIG ONE !!

Désolé si je n'ai pas pris assez de photos, mais j'essayais de trouver mes marques, et mon cerveau surchauffait ;)
Donc après plusieurs essai pour le rendre crédible.. je veux dire, une chute d'eau comme ca, ne tombe pas comme les autres du haut avec un aspect laminaire, mais elle doit être plus ronde.
J'ai donc pris un fil dentaire, trempé dans la résine un peu durcie, pour créer une sorte d'enveloppe autour du fil et je l'ai posé en place.
L'eau artificielle en gel étalée précédemment, m'a servie à entourer la forme primaire déjà en place.
Finalement ca rend plutôt bien.. mais j'ai du fixer un cure dent pour éviter que l'eau ne tombe trop a 90°C, et créer l'arrondi.

Sorry as I did not take all pictures, because I was trying to find my way, and my brain was overheating ;)
So, after multiple try to give the correct aspect.. I mean, this waterfall cannot be like the other, as it cannot fall as a laminar flow, but it should be round here...
So I took, a very thin dental floss, dip into alsmost cured resin, to make an envelop around the string and put in place.
Then I take a large part of my previous water gel brushed, and I applied this around the shape done with the dental floss.

And finally it looks cool.. but I had to shape the form with wooden stick to avoir 90°C angle and gice the natural look of the water flow.


Adding movement

splatches !!

Après un peu plus de détaillage avec de l'eau artificielle, ca commence à rendre bien.

With a bit of improovement using water gel to make foam and splatches.. it start to look cool.

Ah , ce fut un long cheminement, avec des échecs, des surprise, mais au final, n'oubliez jamais, Tout arrive pour une raison !! Expérimentez et vous apprendrez.
J'espère que ca vous a plu !
Photo finish bientot.


So it was a very long journey, when failure was occuring, surprises coming.. but overall, never forget, everything happens for a reason !!! By experimenting ... you learn !

Hope you like it !
Very soon final pictures.

Thanks !

mercredi, novembre 28, 2018

Posted by Guillaume On mercredi, novembre 28, 2018


Pas seulement un projet mais tout son travail mérite un coup de coeur, l'excellent : JB Andre = Jean diorama
Not only one project, but more for the global work of the wonderful guy : JB Andre = Jean diorama


40 jour dans le desert par Allan Carrasco
40 days in desert by Allan Carrasco


Massimiliano Amon Richiero > Vu au Monte San Savino Show 2018. J'adore tout ce qui touche à Miyazaki !
Massimiliano Amon Richiero > See at the Monte San Savino Show 2018. Always love Miyazaki’s style !


Astela by Patricia Sancho
Patrica a fait un "p..." de bon travail dessus. Peut-être une piste d'amélioration sur les coups de pinceau... mais pour l'ambiance : une figurine catégorie Master !
Patricia did a real "f..." good job on it. Perhaps, a little improvement on brush strokes... but for the ambiance: Master piece!


Studio Delavida pour Sygill Forge

J'aime beaucoup l'ambiance de ce display. 
I really like the atmosphere of this display.


Superbe idée pour présenter et transporter une Killteam pour jouer, avec la présence de l'histoire de l'escouade sous forme de bande dessinée!
Very nice idea to show and transport a playable Killteam, with the story of the squad as a comic book!